Keeping your puppy’s ears clean is essential to their overall health. Whether your dog has floppy ears like a Cocker Spaniel or perky ears like a Husky, regular ear cleaning helps prevent infections, odor, and discomfort. If you’re wondering how to clean puppy ears safely and effectively, you’re in the right place.
This guide walks you through everything you need to know about puppy ear cleaning, including when to clean, how to do it, what tools to use, and signs that your puppy may need veterinary attention.
Table of Contents
- Why Cleaning Your Puppy’s Ears Matters
- How Often Should You Clean Your Puppy’s Ears?
- Signs Your Puppy’s Ears Need Cleaning
- Supplies You’ll Need
- How to Clean Puppy Ears: Step-by-Step
- What Not to Do When Cleaning Puppy Ears
- When to Call the Vet
- FAQ: Puppy Ear Cleaning Questions
Why Cleaning Your Puppy’s Ears Matters
Your puppy’s ears are warm, moist, and perfect environments for bacteria and yeast to grow if not cleaned properly. Cleaning their ears:
- Helps prevent ear infections
- Removes excess wax and debris
- Eliminates bad odors
- Keeps your pup comfortable and itch-free
Some breeds are more prone to ear issues, especially those with floppy ears or a history of allergies. Consistent care is essential for these puppies.
How Often Should You Clean Your Puppy’s Ears?
The frequency of ear cleaning depends on the puppy’s breed, activity level, and ear anatomy. As a general guideline:
- Weekly: For puppies with floppy or hairy ears (e.g., Beagles, Poodles)
- Every 2–4 weeks: For breeds with upright ears and no history of infections
- After swimming or baths: Always dry and clean ears post-water exposure
Over-cleaning can cause irritation, so always monitor your puppy’s reaction and ear condition.
Signs Your Puppy’s Ears Need Cleaning
Be on the lookout for these signs that indicate it’s time for an ear cleaning:
- Foul or yeasty odor from the ears
- Visible dirt or dark wax
- Frequent head shaking or scratching
- Redness or swelling in the ear canal
- Crying or pulling away when you touch their ears
If symptoms persist after cleaning, it may be more than just dirt—consult your vet for a proper diagnosis.
Supplies You’ll Need
Before starting, gather the following items:
- Dog-safe ear cleaning solution (never use hydrogen peroxide or alcohol)
- Cotton balls or gauze (not Q-tips, which can damage the ear canal)
- Clean towel
- Treats (for rewarding cooperation)
Optional: Ask your vet for product recommendations, especially if your puppy has sensitive ears or existing conditions.
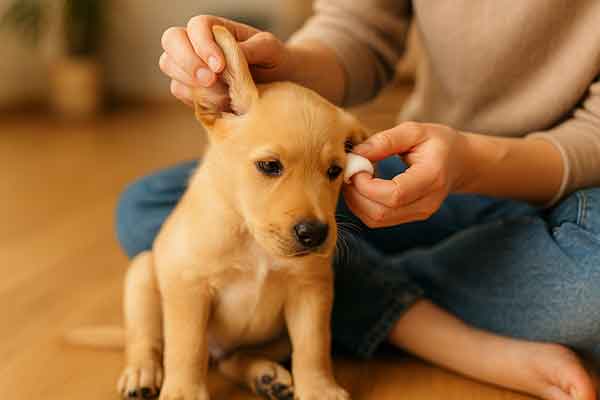

How to Clean Puppy Ears: Step-by-Step
Step 1: Choose a Calm Setting
Pick a quiet time when your puppy is relaxed. Gently pet and soothe them before starting.
Step 2: Inspect the Ears
Look for redness, swelling, discharge, or bad smells. If any of these signs are severe, delay cleaning and consult your vet.
Step 3: Apply Ear Cleaner
Hold the ear flap upright and gently squeeze the cleaning solution into the ear canal (per instructions on the product label). Don’t insert the nozzle too deeply.
Step 4: Massage the Base of the Ear
Gently massage for 20–30 seconds to loosen debris. You should hear a squishing sound.
Step 5: Let Your Puppy Shake
Allow your puppy to shake their head. This helps dislodge loosened debris naturally.
Step 6: Wipe Out Debris
Use a cotton ball or gauze to gently wipe the outer ear and visible parts of the ear canal. Never insert anything deep into the ear.
Step 7: Repeat if Needed
If both ears are dirty, repeat the process on the other ear. Offer treats throughout to associate the experience with positivity.
What Not to Do When Cleaning Puppy Ears
- ❌ Don’t use Q-tips or anything that enters deep into the ear canal
- ❌ Avoid alcohol, vinegar, or hydrogen peroxide — these can cause irritation
- ❌ Don’t clean ears that are already inflamed or bleeding
- ❌ Never use human ear cleaning products
When in doubt, consult your vet before proceeding with ear cleaning, especially if it’s your puppy’s first time.
When to Call the Vet
If your puppy shows signs of an ear infection or persistent discomfort, it’s time to consult a veterinarian. Common symptoms of ear infections include:
- Constant scratching and head shaking
- Dark brown, yellow, or bloody discharge
- Strong odor that doesn’t go away after cleaning
- Swelling, scabs, or crusting around the ears
Ear infections can worsen quickly if untreated, so prompt professional care is essential.
FAQ: Puppy Ear Cleaning Questions
How often should I clean my puppy’s ears?
Most puppies need ear cleaning every 1 to 4 weeks depending on their breed and activity level. After baths and swimming, a gentle clean is often beneficial.
What can I use to clean my puppy’s ears?
Use a veterinarian-approved dog ear cleaner. Avoid household items like vinegar, hydrogen peroxide, or alcohol-based products.
Can I use Q-tips to clean my puppy’s ears?
No. Q-tips can push debris deeper and risk damaging the eardrum. Use cotton balls or gauze instead.
Is ear wax normal in puppies?
A small amount of pale yellow or light brown wax is normal. Dark, thick, or smelly discharge may indicate infection.
Should I clean my puppy’s ears even if they look clean?
No need to clean just for the sake of it. Over-cleaning can irritate the ear. Only clean when there’s visible dirt, odor, or as part of regular grooming.
Conclusion
Now you know exactly how to clean puppy ears safely and effectively at home. Ear care is a vital part of puppy grooming that helps keep your dog healthy and comfortable. With the right tools, technique, and patience, ear cleaning can become a stress-free part of your puppy care routine.
Always pay attention to your puppy’s behavior and ears. When in doubt, reach out to your vet for guidance. A clean-eared pup is a happy pup!